AWS ELBでメンテナンス(503)画面を表示する

awsのelbだけで、メンテナンス画面を表示させる方法です。
elbのルートの条件は下記のようにしています。

条件やレスポンスなど 適宜調整してください。
パス
*
レスポンスコード
503
Content-Type
text/html
レスポンス本文
<!DOCTYPE html>
<html>
<head>
  <title>メンテナンス作業中です。(503)</title>
  <meta content="width=device-width, initial-scale=1.0" name="viewport" />
  <meta charset="UTF-8" />
  <style>
    .page {
        margin-top: 60px;
    }
    .tit_box.center {
      text-align: center;
    }
    .page .page_inner {
      max-width: 640px;
      text-align: center;
      margin: 0 auto;
    }
  </style>
</head>
<article class="page">

  <div class="tit_box center">
    <img src="https://placehold.jp/60/666666/ffffff/300x300.png?text=503%0A" >
  </div>
  <div class="tit_box center">
    <h1 class="page-title">503 Service Unavailable<br>ただいま、メンテナンス作業中です</h1>
  </div>

  <div class="page_inner">
    <p>
      メンテナンス作業中のため、ただいまサービスをご利用頂くことができません。<br>
      ご迷惑をおかけして大変申し訳ありませんが、終了までしばらくおまちください。<br>
    </p>
  </div>
</article>

<body>
</body>
</html>
上記のようなルートを作っておき、 必要な時に、条件の一番先頭に移動すると、いつでもメンテナンス画面に変更することができます。

関連記事

Local開発用に スタンドアローン版 graphql playground を インストールして使う

aws Lambda の serverless で graphqlのAPIサーバーを開発しているけど、 コンソールからこんな感じのコマンド叩くのに辛みを感じできたので
curl http://localhost:3000/local/graphql -X POST -H "Content-Type:application/json" -d '{"query": "query {user {id, name}}"}'
graphql-playground とか graphiql を使いたい!
最初は、Lambda に一緒にのせてホスティングできないかなとも考えましたが、 もろもろ大変そうなので graphql-playground のスタンドアローン版を使うことにしました。
インストール
早速インストールですが、 インストーラー(.dmg)をこちらのページからをダウンロードしてインストールしました。
起動
今回ローカル環境として、serverless offline プラグインで起動しています。
下記で起動
sls offline start -s local
すると
http://localhost:3000/local/graphql
でアクセスできるように設定しています。
設定
graphql-playground のアプリを起動すると、 Localのフォルダを指定するか、エンドポイントを指定するかをきかれるので 先程起動したローカル環境のエンドポイントを指定して Openします。
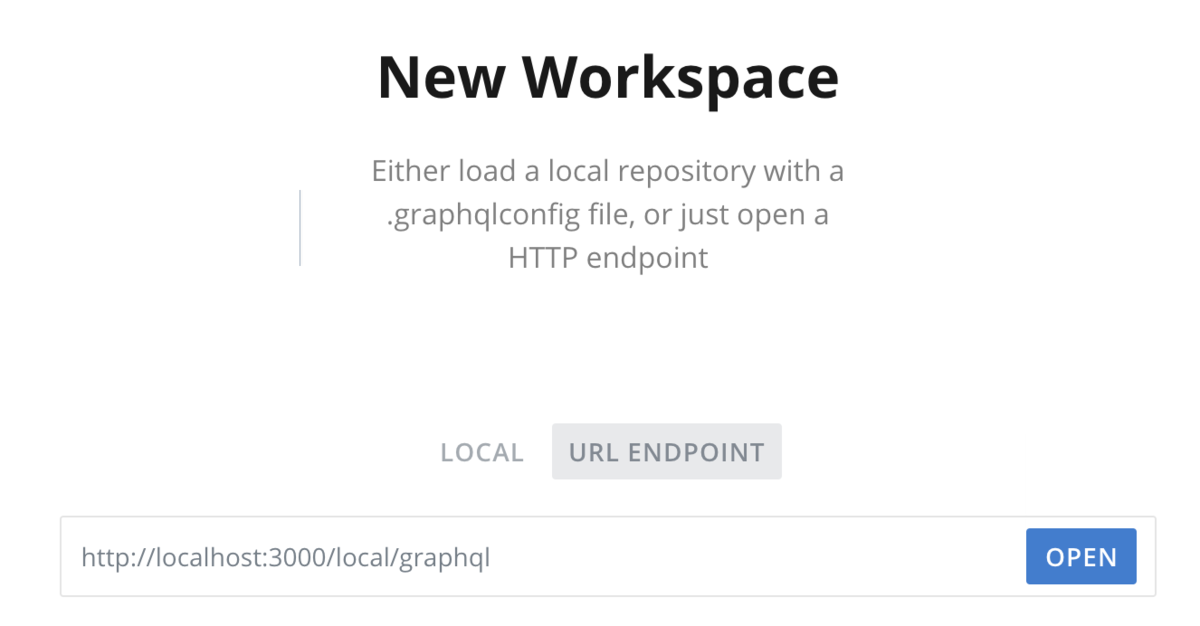
設定はほとんどなくこれだけで使えるようになります。
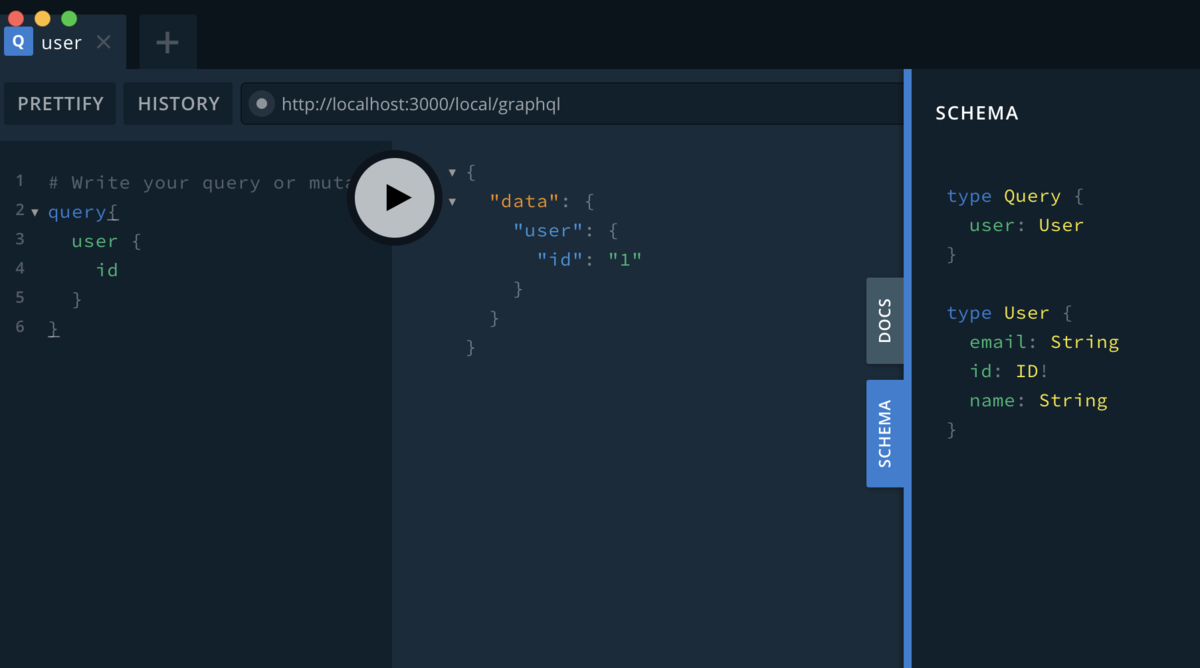
AWSにデプロイ後の、APIゲートウェイの エンドポイントに設定を変えるだけでも使えるので フロント側の開発が別の人でも、簡単に共有できると思います
関連記事

初めてのGraphQL ―Webサービスを作って学ぶ新世代API
- 作者:Eve Porcello,Alex Banks
- 発売日: 2019/11/13
- メディア: 単行本(ソフトカバー)
homebrewで入れたnodenvのバージョンアップ

nodenv で
nodenv install -l
したけど、一覧に該当の新バージョンがないので、nodenvをバージョンアップしたいときの話
下記を実行する!
brew upgrade nodenv node-build
これで無事に最新バージョンが一覧で確認できました。
関連記事

- 作者:Mario Casciaro,Luciano Mammino
- 発売日: 2019/05/18
- メディア: 単行本(ソフトカバー)
brew update でエラー
brew updateしたら下記のようなエラーが発生
Error:
  homebrew-core is a shallow clone.
  homebrew-cask is a shallow clone.
To `brew update`, first run:
  git -C /usr/local/Homebrew/Library/Taps/homebrew/homebrew-core fetch --unshallow
  git -C /usr/local/Homebrew/Library/Taps/homebrew/homebrew-cask fetch --unshallow
This restriction has been made on GitHub's request because updating shallow
clones is an extremely expensive operation due to the tree layout and traffic of
Homebrew/homebrew-core and Homebrew/homebrew-cask. We don't do this for you
automatically to avoid repeatedly performing an expensive unshallow operation in
CI systems (which should instead be fixed to not use shallow clones). Sorry for
the inconvenience!
メッセージにあるとおり下記をそれぞれ実行して解決しました。
  git -C /usr/local/Homebrew/Library/Taps/homebrew/homebrew-core fetch --unshallow
  git -C /usr/local/Homebrew/Library/Taps/homebrew/homebrew-cask fetch --unshallow
関連記事
Shopify のテーマを Theme Kit で作るための環境構築
Shopify のテーマを Theme Kit で作るための環境構築です。 本当に最初の最初
Macに Theme Kit を install
brew tap shopify/shopify
brew install themekit
インストールの確認
theme help
Usageが表示されればinstall 成功。
Complete documentation is available at https://shopify.github.io/themekit/

Usage:
  theme [command]

Available Commands:
  configure   Create a configuration file
  deploy      deploy files to shopify
  download    Download one or all of the theme files
  get         Get a theme and config from shopify
  help        Help about any command
  new         New will generate a new blank slate theme in the same directory where it gets called from and create a new theme on Shopify with those files.
  open        Open the preview for your store.
  publish     publish a theme
  remove      Remove theme file(s) from shopify
  update      Update Theme kit to the newest version.
  version     Print the version number of Theme Kit
  watch       Watch directory for changes and update remote theme

Flags:
      --allow-live                 Will allow themekit to make changes to the live theme on the store.
  -c, --config string              path to config.yml (default "/Users/jimai/workspaces/MyProject/shopify/config.yml")
  -d, --dir string                 directory that command will take effect. (default current directory)
  -e, --env stringArray            environment to run the command (default [development])
  -h, --help                       help for theme
      --ignored-file stringArray   A single file to ignore, use the flag multiple times to add multiple.
      --ignores stringArray        A path to a file that contains ignore patterns.
      --no-ignore                  Will disable config ignores so that all files can be changed
      --no-update-notifier         Stop theme kit from notifying about updates.
  -p, --password string            theme password. This will override what is in your config.yml
      --proxy string               proxy for all theme requests. This will override what is in your config.yml
  -s, --store string               your shopify domain. This will override what is in your config.yml
  -t, --themeid string             theme id. This will override what is in your config.yml
      --timeout duration           the timeout to kill any stalled processes. This will override what is in your config.yml
      --vars string                path to an file that defines environment variables
  -v, --verbose                    Enable more verbose output from the running command.

Use "theme [command] --help" for more information about a command.
Access keyを生成する
shopify管理画面からAPIのAccessキーを生成します。
アプリ管理 > プライベートアプリを管理する をクリック
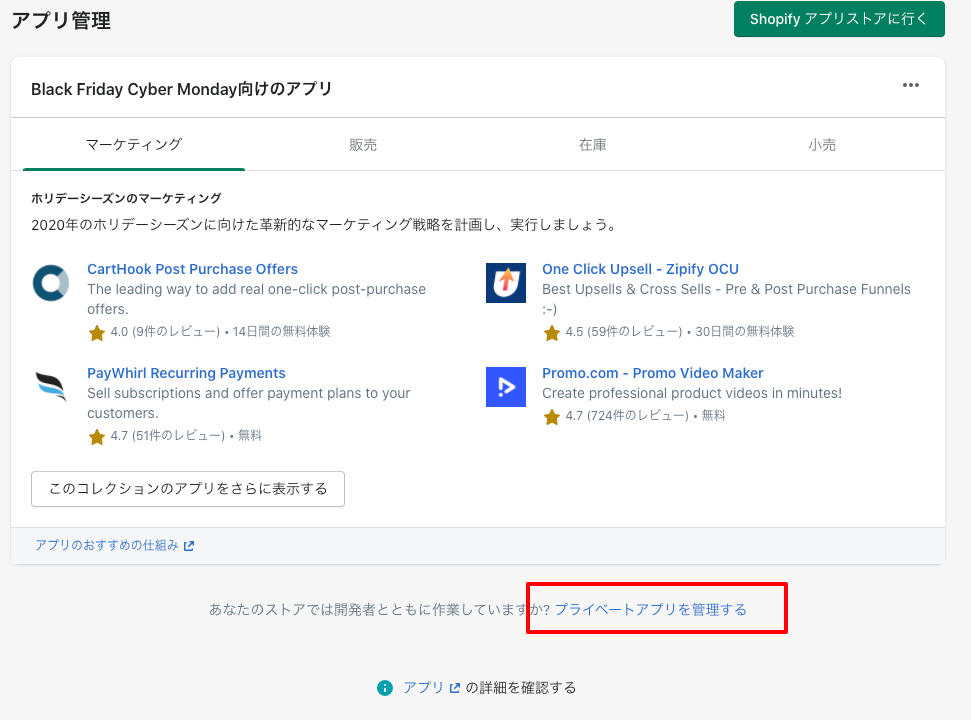
諸々同意しならが、アプリを作成
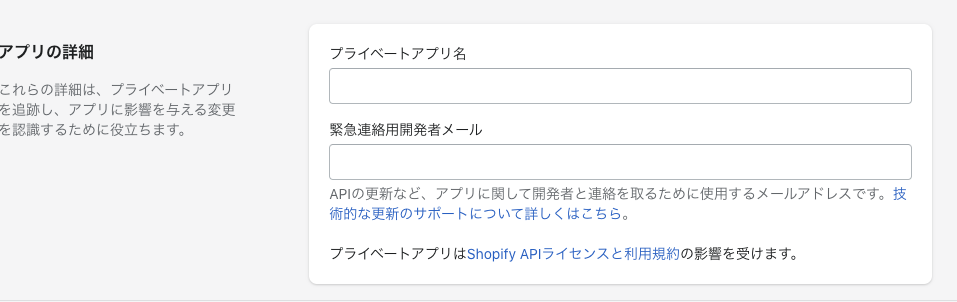
アプリ名と連絡先emailを設定
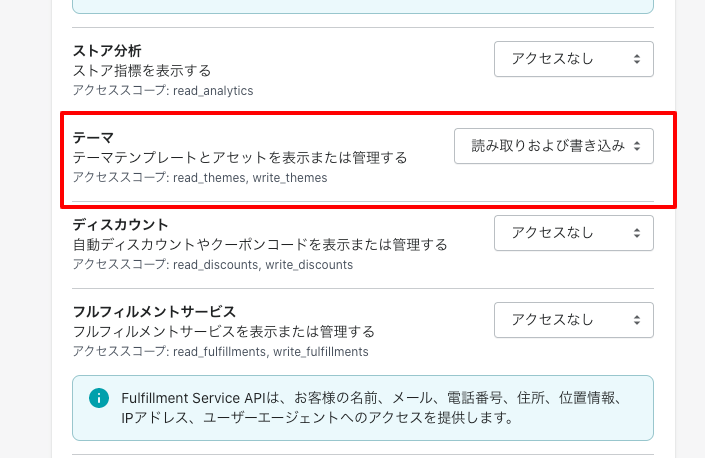
テーマを 読み書きできるようにアクセス権を変更
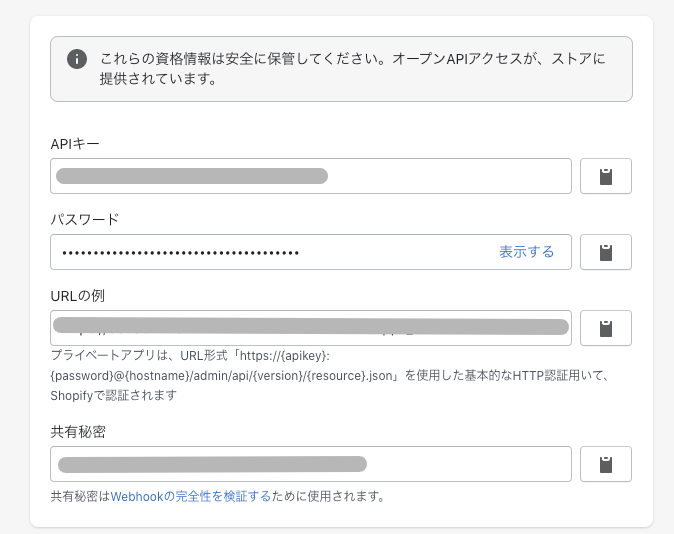
保存すると、キーやパスワードが生成されます。
テーマを新規作成
mkdir my-theme
cd my-theme
theme new --password=[your-password] --store=[your-store.myshopify.com] --name=[theme name]
[your-password]  => 管理画面で生成されたパスワード
[your-store.myshopify.com]  => 自分のshopify の ドメイン部分 (xxxxx.myshopify.com)
[theme name] => テーマ名 任意の名前
これで、ベースのファイルが生成されるので開発に取りかかれます。
開発中に使うコマンド
ブラウザで開発中の内容を確認する場合
theme open
変更をすぐアップロードしてくれる
theme watch
ファイルを全部アップする場合
theme deploy
関連記事
完全攻略ガイド: 〜初めてのECサイト構築〜")
Railsからvueへpropsへデータの受け渡し方法

下記の例では、Rails側のテンプレートで items/show.html.slim の id="recommend-category" の dataに code と item-group-codeを設定しています。(ケバブケースが良い様です)
items/show.html.slim
#recommend-category(data-code="#{@item_group.code}" data-item-group-code="#{@item_group.code}")

= javascript_pack_tag 'item'
recommend-category に vueを反映しつつ、propsにdataセットを渡しています。 app/javascript/packs/item.js
import RecommendCategories from './components/category/RecommendCategories'

document.addEventListener('DOMContentLoaded', () => {
  new Vue({
    el: '#recommend-category',
    render: h => h(RecommendCategories, { props: document.getElementById("recommend-category").dataset})
  })
})
vueのコンポーネント側では、propsで受け取ります。
app/javascript/packs/components/category/RecommendCategories.vue

`export default {
  props: ['itemGroupCode', 'code'],
}
関連記事

Rails x Vue x Graphql x webpackerの IE11対応
自分用のメモ

Graphql (Apollo) の実行に 下記が必要。 たぶん fetch するため
isomorphic-unfetch
yarn add isomorphic-unfetch
app/javascript/packs/application.js に下記を追加
import "core-js/stable";
import "regenerator-runtime/runtime";
import 'isomorphic-unfetch'
async / await で import "regenerator-runtime/runtime"; が必要らしい
babel.config.js
presets: [
      isTestEnv && [
        '@babel/preset-env',
        {
          targets: {
            node: 'current'
          },
          useBuiltIns: 'usage',
        }
      ],
      (isProductionEnv || isDevelopmentEnv) && [
        '@babel/preset-env',
        {
          forceAllTransforms: true,
          useBuiltIns: 'entry',
          corejs: 3,
          modules: false,
          exclude: ['transform-typeof-symbol']
        }
      ]
    ]
感想
IE対応はそろそろ終わりにしたい。
関連記事

- 作者:山田 祥寛
- 発売日: 2019/08/22
- メディア: 単行本